User Guide
What Is BandConnect++?
Unlock your musical potential with BandConnect++ !
BandConnect++ is a powerful desktop app that helps independent music producers manage their musician contacts and create perfect bands with ease.
Say goodbye to the tedious process of scrolling through your phone contacts and noting down every potential musician for your dream bands! With BandConnect++, you own the freedom to experiment with various hypothetical band makeups. You can
- create a new band from scratch
- add/remove your musician contacts to/from the band
- check if their instruments and genres are a perfect match.
What’s more, BandConnect++ has a convenient and intuitive Command Line Interface (CLI) that allows you to perform all the tasks with just a few keystrokes. It may be a little daunting at first, but don’t worry! We have prepared a comprehensive user guide to get you started and answer your confusion. Once you get the hang of it, your efficiency will be brought to a whole new level!
So, no more waiting! Let’s start creating your first dream band now!
Using the Guide
This user guide walks you through the essential features of BandConnect++, familiarises you with the CLI commands, GUI interface, and provides the best help we can if problem arises. We have made this guide beginner-friendly so that anyone who has used a software application before should have no trouble understanding it!
Whether you are new to our application or a seasoned user, you can always find something useful in this guide.
-
For first-time users, please go to the Quick Start section to start an end-to-end tutorial that gets you onboard. Should you encounter any difficulty understanding the terminology, don’t forget to refer to the Glossary!
-
For experienced users who have used BandConnect++ before, if you need help in remembering a particular command, please see Command Summary. You can also refer to the Features section for a more detailed explanation of each command.
If you encounter any problems along your journey, please take a look at the Troubleshooting section and also refer to our FAQ for more information.
Throughout this guide, we also use coloured boxes to provide any extra information that you may find useful.
![]() Information
Information
Content in blue boxes provides additional information and contextual knowledge you need to better understand the application.
![]() Tips
Tips
Content in green boxes provides tips and good practices to help you use the application more efficiently.
![]() Warnings
Warnings
Content in red boxes draws your attention to potential pitfalls to avoid and alert you to possible mistakes.
Keep an eye out for them!
Table of Contents
- What Is BandConnect++?
- Using the Guide
- Table of Contents
- Quick Start
- Features
- Command summary
- Frequently Asked Questions
- Troubleshooting
- Glossary
Quick Start
-
Ensure you have Java 11 or above installed in your Computer. If you have never downloaded it before, download from here.
-
Download the latest version of BandConnect++.
-
Move the file to the home folder you want to access the app.
Recommended: Drag the downloaded file to your desktop so that you can access it from there.
-
From the home folder, open “Terminal” on MacOS or “Command Prompt” in Windows, and type
java -jar BandConnect++.jarto run the application. A GUI similar to the below should appear in a few seconds.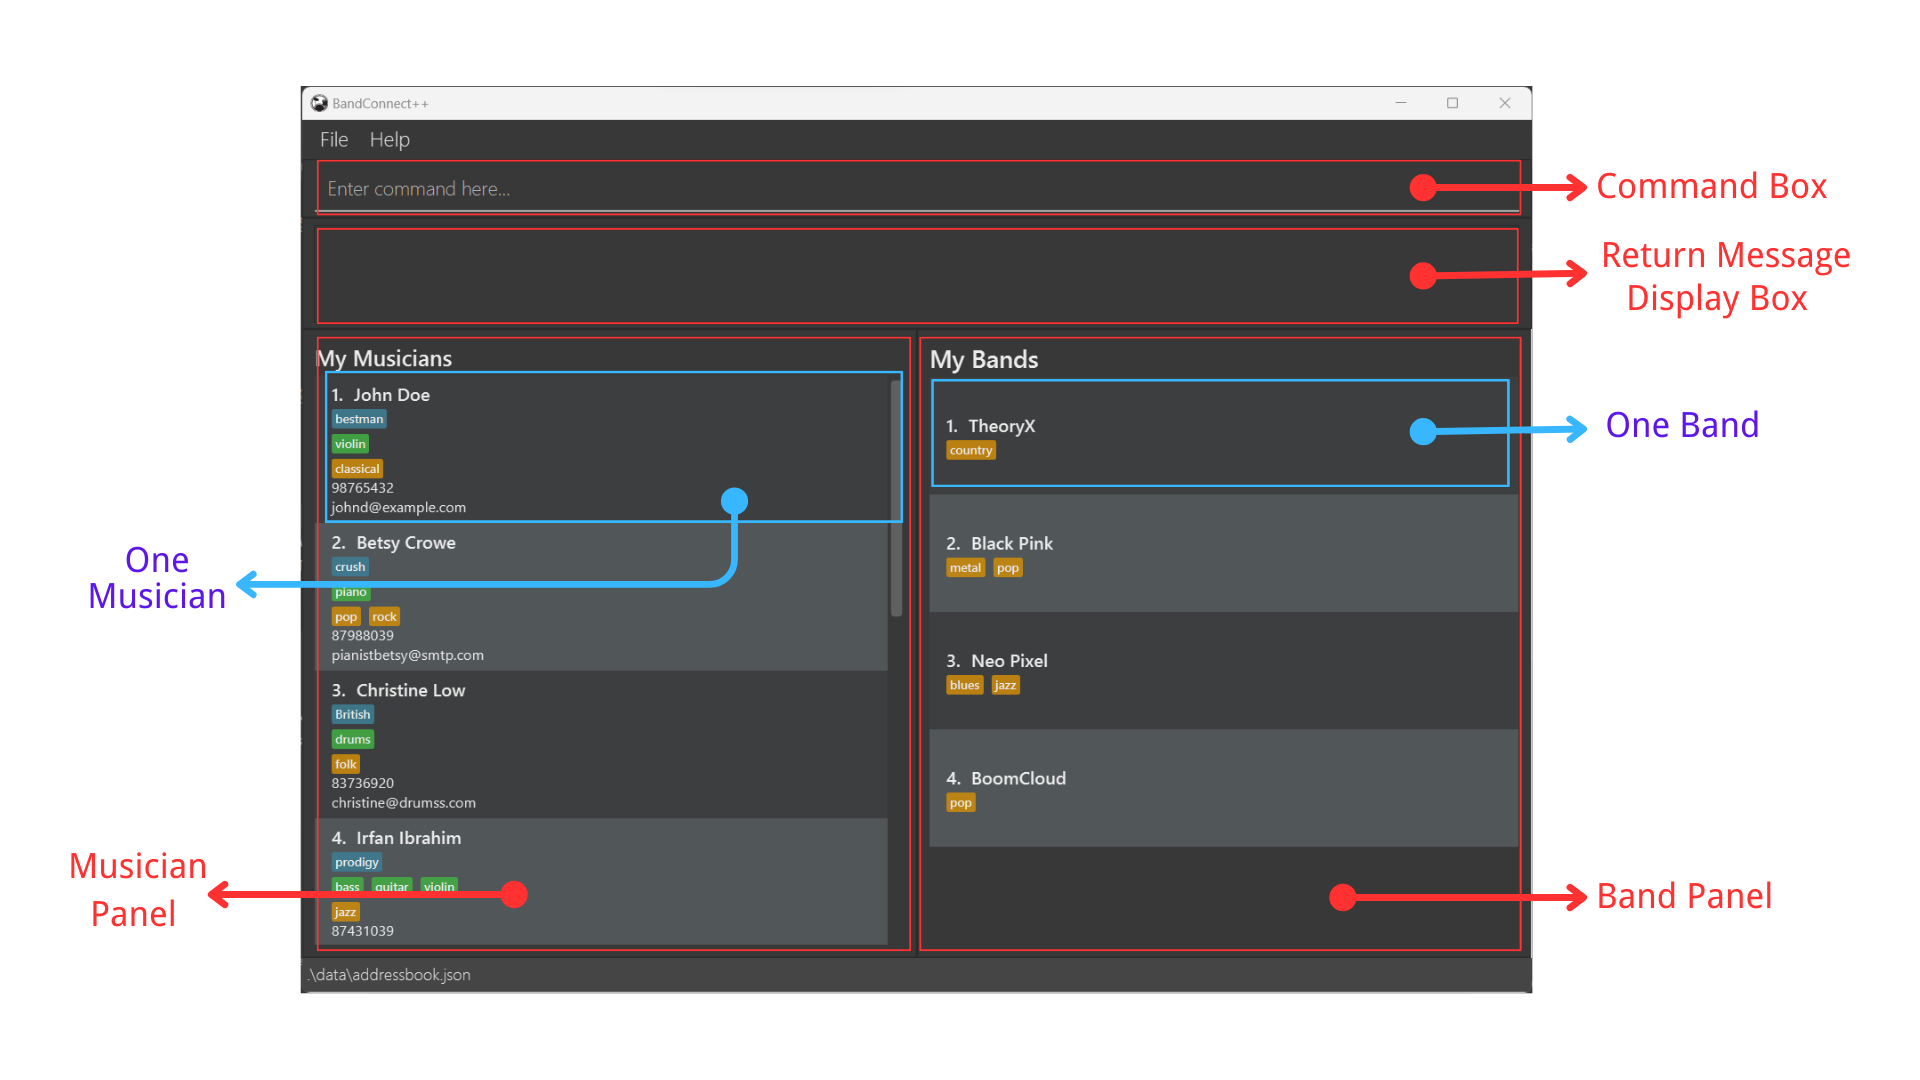
- Musicians are displayed in the left panel.

- Bands are displayed in the right panel.

The app already contains some sample data to help you get started. - Musicians are displayed in the left panel.
-
To execute a command, enter it in the command box and press
Enterto execute it. The following are some example commands you can try:-
help: Open the help window. -
list: Lists all contacts. -
add n/Alice Lovelace p/98757287 e/alicel@example.com i/bass g/rock: Adds rock bassist Alice Lovelace. -
addb n/Maverick g/rock: Adds a rock band named Maverick. -
findb TheoryX: Finds the band named “TheoryX” and views its members. -
exit: Exits the app.
Please refer to the Features below for details of each command.
-
Features
![]() How to interpret each feature description:
How to interpret each feature description:
The description of each feature is divided into 6 parts:
- Name - The name of the feature.
- Scenario - A scenario that illustrates when and why the feature is useful.
- Format - The format of the command for the feature.
- Examples - Examples of using the command and their effects.
- Things to Note - Any additional information that the user should take note of when using the feature.
- Outcomes - The expected successful and failed outcomes.
![]() Notes about the command format:
Notes about the command format:
When looking at the command format of each feature the first time, it might seem confusing. But, they all follow a general pattern, and here is the explanation of the pattern with an example of adding a musician contact to the application:
add n/NAME p/PHONE_NUMBER e/EMAIL [t/TAG]… [i/INSTRUMENT]… [g/GENRE]…
-
The first word represents the command name, in this case,
add. -
The words in uppercase represent the parameters to be provided by the user, and their meanings are self-explanatory. For example,
n/NAMEmeans you need to provide a name for the contact. -
The prefixes like
n/,p/,e/are used to identify the parameters. So, when typingadd n/John Doe, the application knows thatJohn Doeis the name of the musician. -
The parameters in square brackets like
[g/GENRE]are optional, while the parameters without square brackets liken/NAMEare compulsory. -
The parameters in with
…like[g/GENRE]…can be entered multiple times (including zero times). For example,g/rock g/jazzorg/bluesorare all valid. -
The order of the parameters does not affect the result. For example,
p/PHONE_NUMBERcan be entered beforen/NAME, and the command still works the same. -
Extraneous parameters for commands that do not take in parameters (such as
help,list, ortags) will be ignored.
![]() Information
Information
When you use any features with INDEX as a parameter, kindly refer to the index in the current displaying panels.
Features for managing musicians
Add musician: add
Scenario:
You have just met a talented musician and see him/her as a potential fit for your dream band. Let’s add him/her to your contact list.
Format:
add n/NAME p/PHONE_NUMBER e/EMAIL [t/TAG]… [i/INSTRUMENT]… [g/GENRE]…
Examples:
-
add n/Hans Leonhart p/98765432 e/hansl@music.com t/german i/violin g/classicalThis command adds Hans Leonhart to your contact list. He plays the violin and specialises in classical music. He is also one of the few German musicians you know.
Things to Note
- To add the instruments and genres the musician specialises in using the
i/andg/prefixes, you can only add the ones included in a pre-defined list of instruments and genres.
![]() Warnings
Warnings
Please ensure you input meaningful names and avoid ambiguous names like “123”, unless you are confident that it will not cause future confusion:)
Upon success:
A success message like below will be displayed.
New musician added: Hans Leonhart; Phone: 98765432;
Email: hansl@music.com; Tags: [german];
Instruments: [violin]; Genres: [classical]
Upon failure:
- If you input a musician which is already in your contact book (i.e. a musician with either the same name, the same phone number, or the same email as an existing contact). You will be shown an error message like below. Please re-enter the correct information.
This musician already exists in your contact list - If you provide invalid arguments for any of the parameters (name, email, etc.) you will be shown the corresponding error message with the correct format to follow. Please re-enter the correct information.
Delete musician: delete
Deletes a musician from your contact list.
Scenario:
You have just found out that a musician contact is outdated and no longer relevant. Let’s find his/her index in the My Musicians panel and delete him/her from your list.
Format:
delete INDEX
Examples:
-
delete 1This command deletes the musician at index 1 in the
My Musicianspanel.
Upon success:
You will see a message indicating successful removal of the musician contact in the musician panel like below:
Deleted Musician: Hans Leonhart; Phone: 98765432;
Email: hansl@music.com; Tags: [german];
Instruments: [violin]; Genres: [classical]
Upon failure:
Should you input an index out of the range of the current My Musicians list, you will see the error message below:
The musician index provided is invalid
Please verify that the index is correct and try again.
Edit musician: edit
Scenario:
You have just found out that a musician contact has changed his/her phone number and email. Let’s edit his/her contact information.
Format:
edit INDEX [n/NAME] [p/PHONE_NUMBER] [e/EMAIL] [t/TAG]… [i/INSTRUMENT]… [g/GENRE]…
Examples:
-
edit 1 p/98765430 g/popThis command edits the phone number of the musician at index 1 in the
My Musicianspanel to 98765430 and changes his/her preferred genre to pop.
Things to Note
- At least one of the optional field to edit must be provided.
- The
INDEXrefer to the index number shown in the currently displayedMy Musicianslist. The index must be a positive integer, e.g. 1, 2, 3, … - If you would like to edit a musician not currently shown, please use the
listcommand first before editing. - When editing tags/instruments/genres, the existing tags/instruments/genres of the musician will be removed i.e adding of tags/instruments/genres is not cumulative.
- You can remove all tags/instruments/genres of the musician by inputting an empty tag/instrument/genre field, e.g.
edit 1 t/ i/ g/.
![]() Tips:
Tips:
The syntax for edit command is identical to the add command except for the additional INDEX parameter.
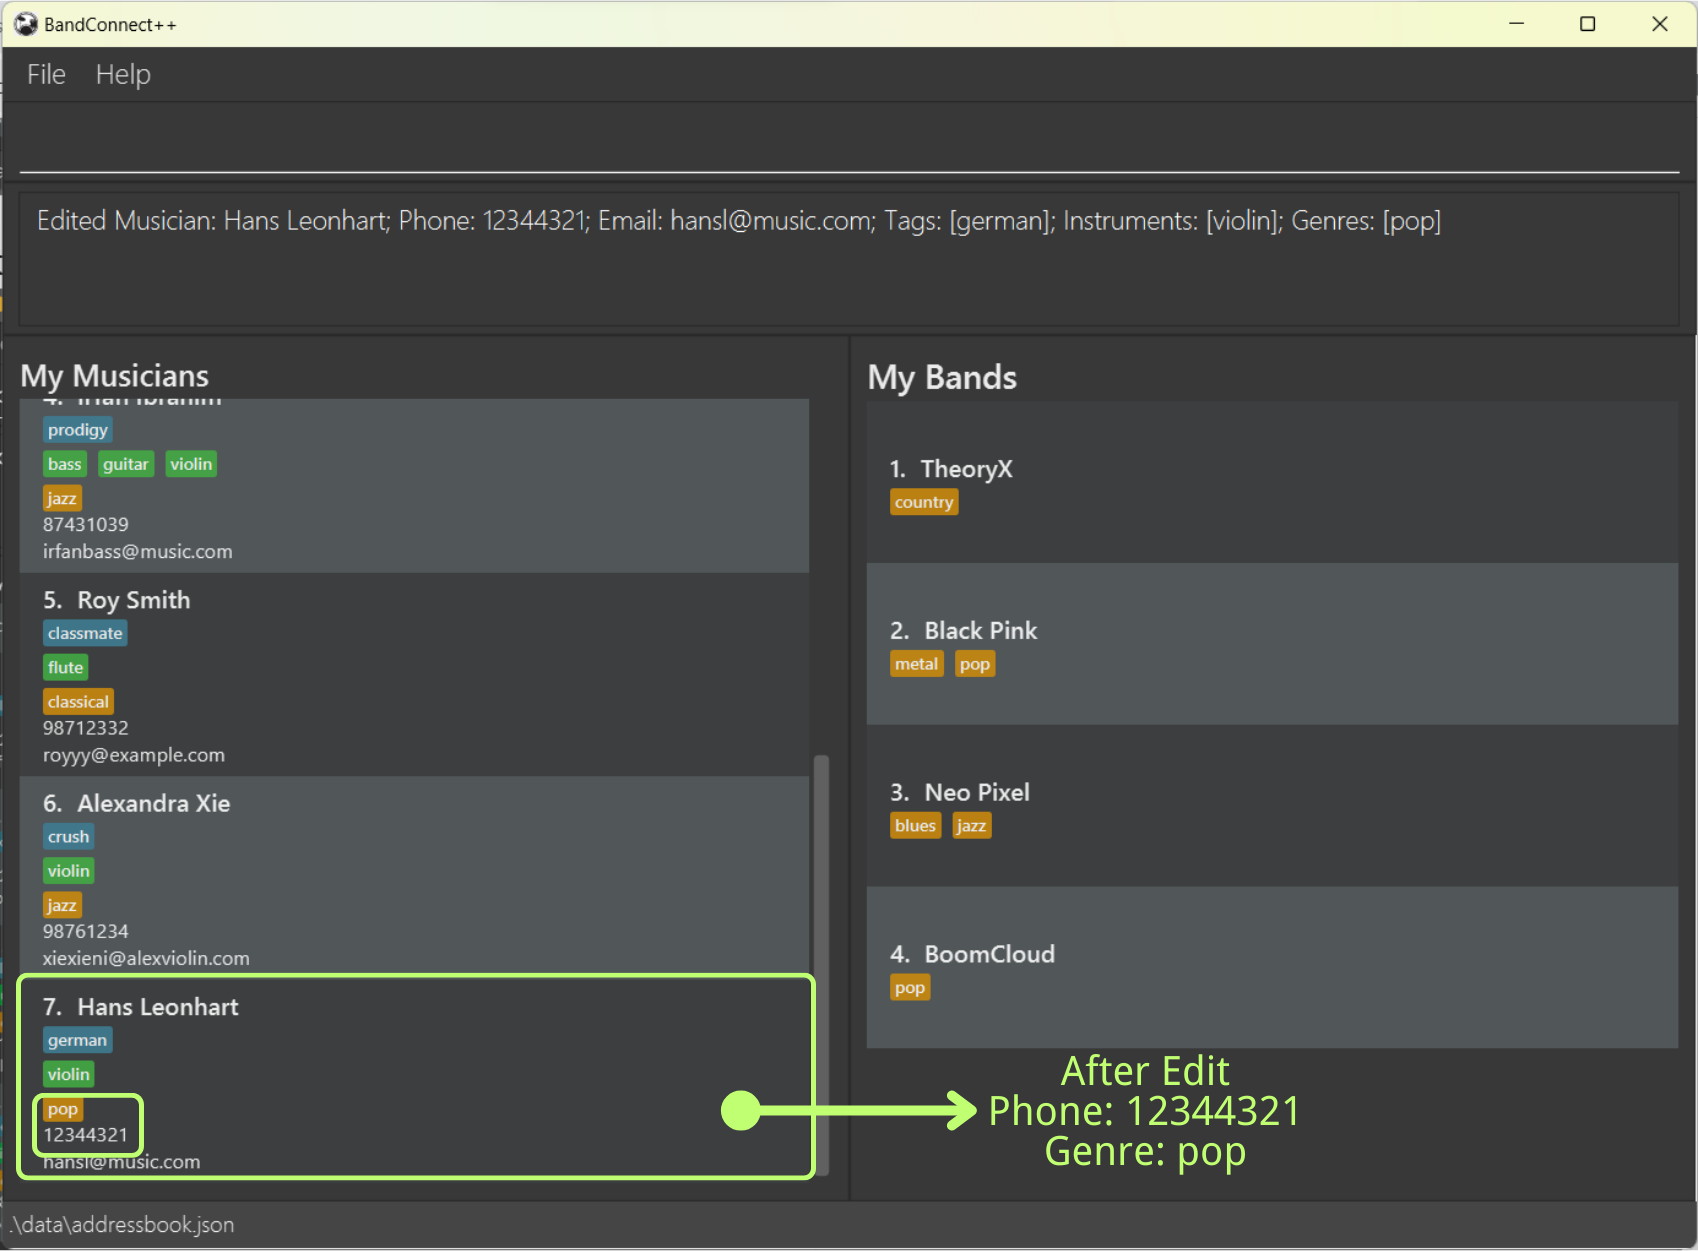
Upon success: A success message like below will be displayed.
Edited Musician: Hans Leonhart; Phone: 98765430;
Email: hansl@music.com; Tags: [german];
Instruments: [violin]; Genres: [pop]
-
Before: From
liststate, Hans Leonhart’s genre is classical and his phone number is 98009432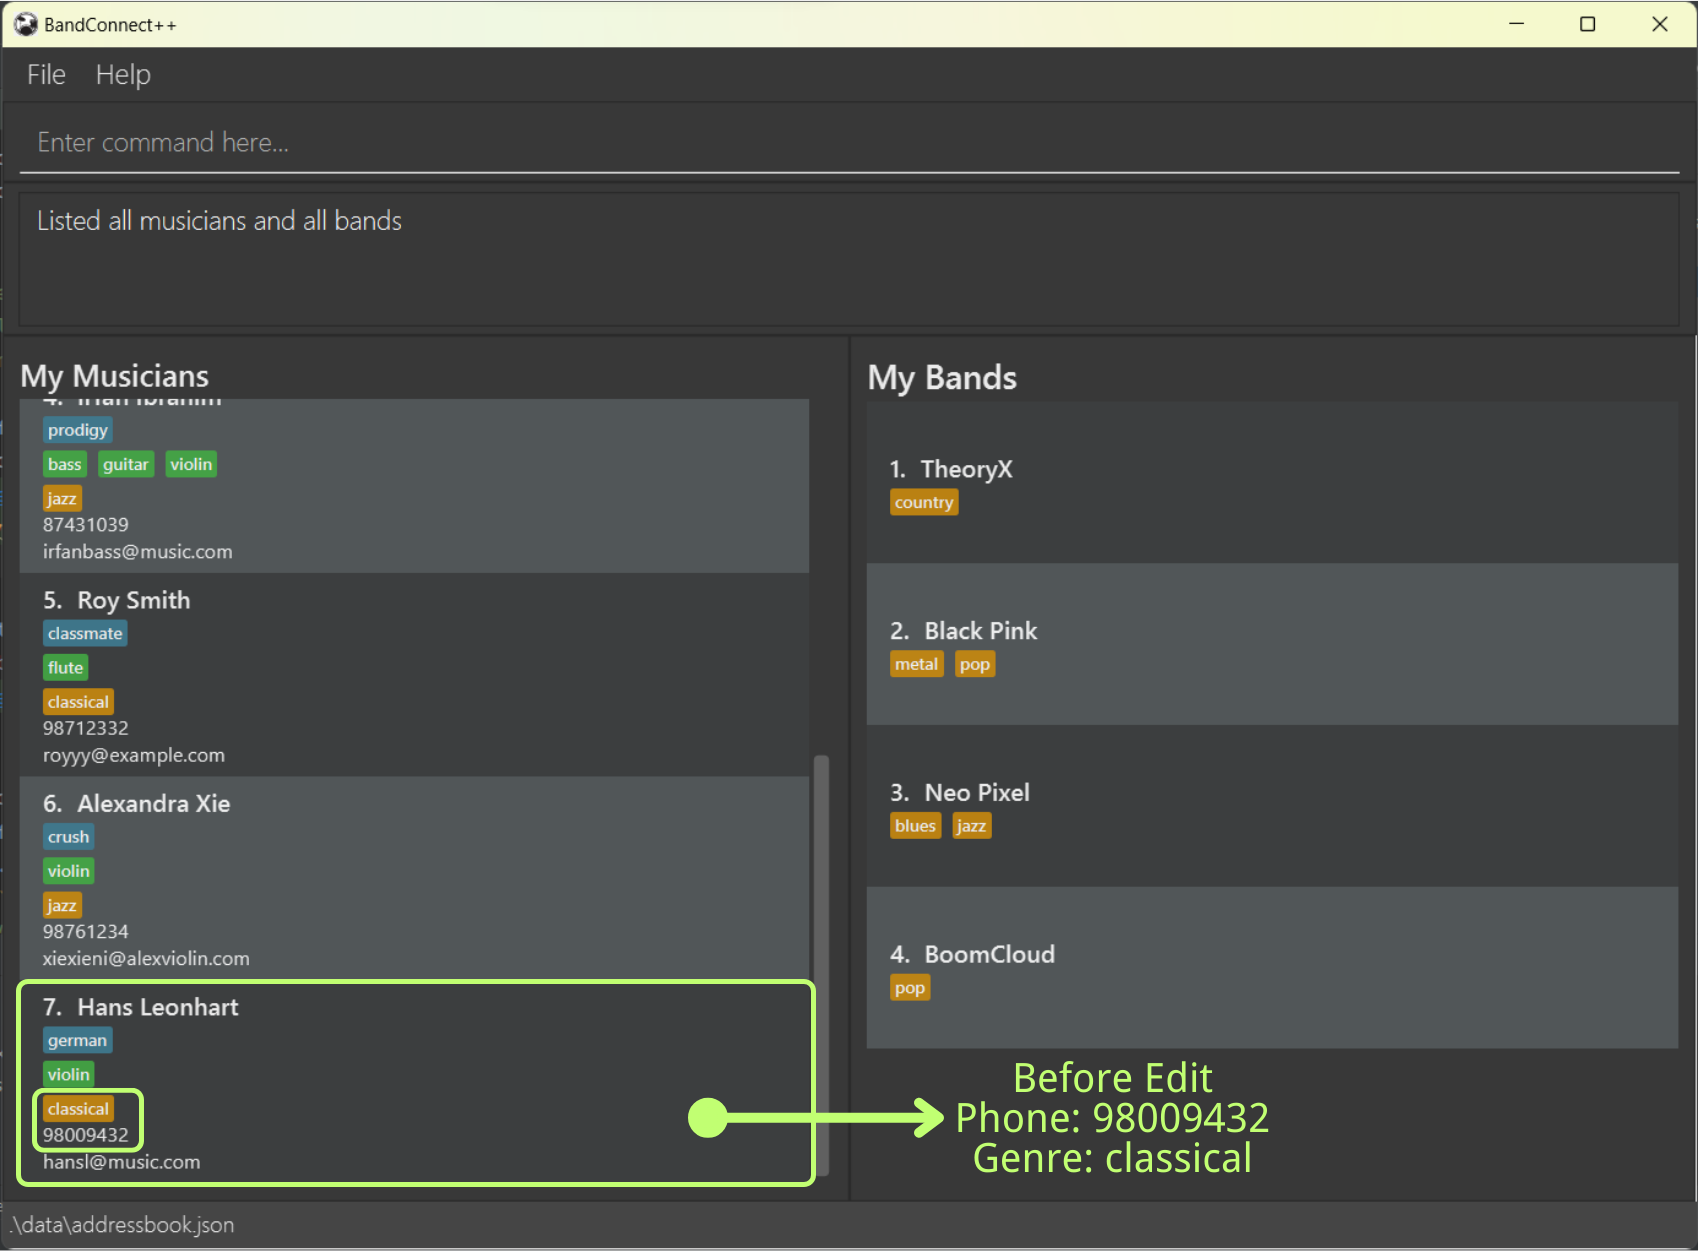
-
After: Hans Leonhart’s genre is changed to pop and his phone number is changed to 12344321
Upon failure:
- If you provide no argument for the musician to be edited, e.g.
edit 1, you will see an error message like below:At least one field to edit must be provided. - If you provide invalid arguments for any of the parameters (name, email, etc.) you will be shown the corresponding error message with the correct format to follow. Please re-enter the correct information.
- If you have provided at least one optional field to edit in the correct format yet the index provided is out of range, you will see the error message below:
The musician index provided is invalidPlease verify that the index is correct and try again.
Find musicians: find
Scenario:
You are about to form a band and are looking for musicians who play certain instruments and specialises in certain genres. Let’s find them in your contact list!
Format:
find [n/NAME]… [t/TAG]… [i/INSTRUMENT]… [g/GENRE]…
Examples:
-
find n/John n/Joe i/violinThis command finds all musicians whose names contain “John” or “Joe” AND play the violin.
-
find t/available t/friendly i/piano g/jazzThis command finds all musicians whose tags contain “available” or “friendly” AND play the piano AND specialises in jazz.
Things to Note
- At least one of the optional field to find must be provided.
- The argument for each field must contain only one word. It cannot be empty and cannot contain multiple words separated by whitespaces.
- The search is case-insensitive. e.g.
johnwill matchJohn - Only full words will be matched e.g.
guitwill NOT matchguitar
Upon success:
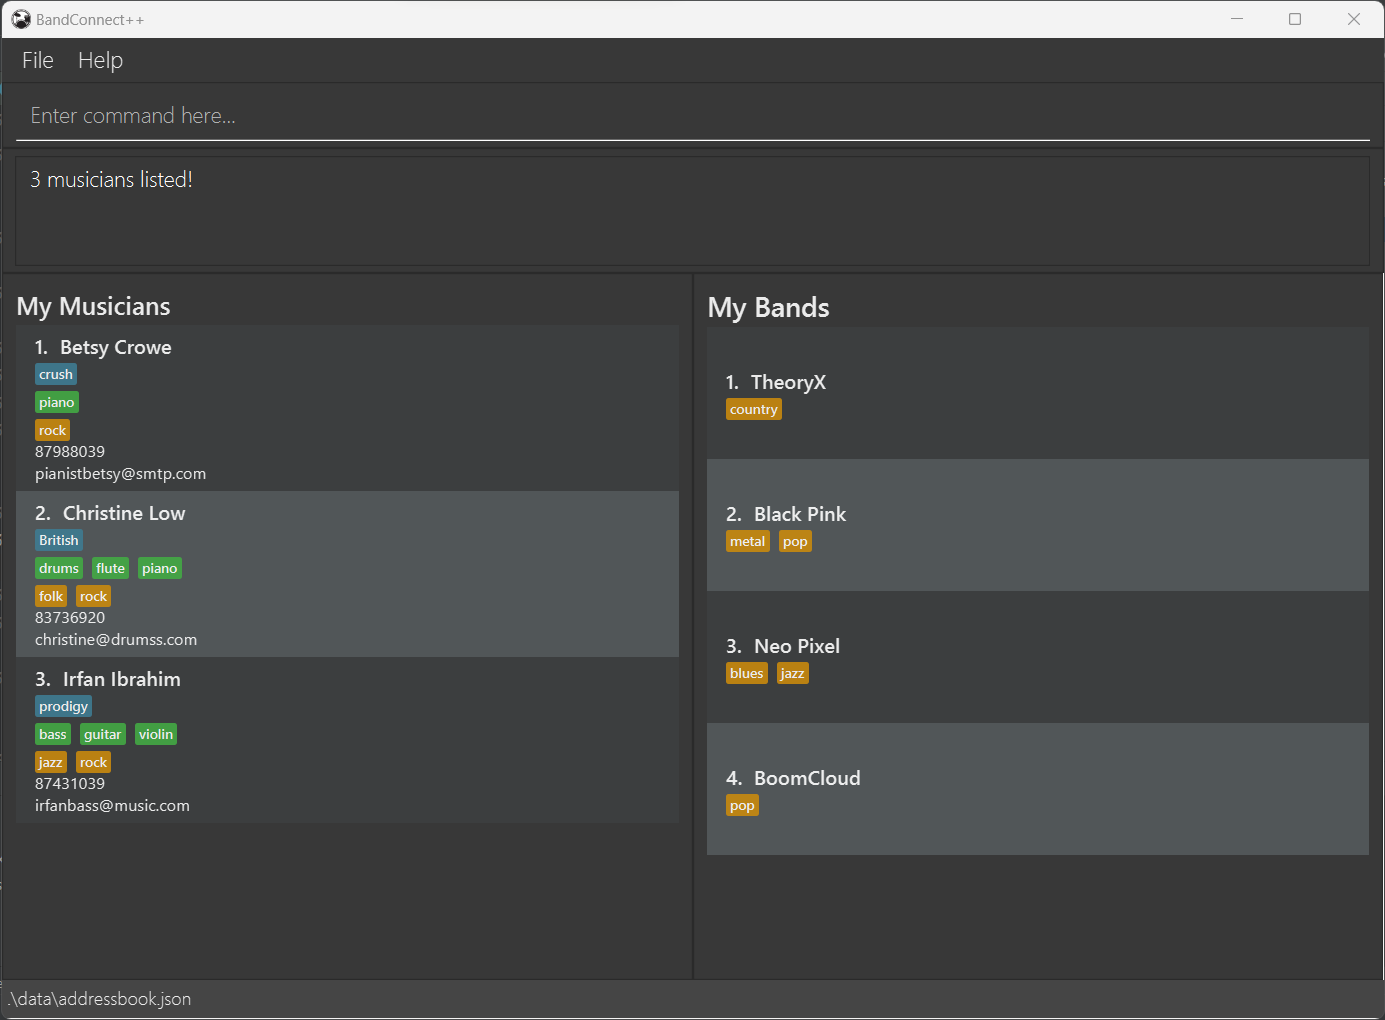
The My Musicians panel will update to show all matching musicians, while the My Bands panel will list all bands.
For example, when the input command is find g/rock i/guitar i/piano
My Musicians panel will display all 3 musicians whose genres contain “rock” AND instruments contain “guitar” or “piano”
Upon failure:
- If you provide no argument for the
findcommand, you will see an error message indicating the command format is invalid with the correct format to follow. - If you provide empty arguments for any of the fields, e.g.
find n/ i/, you will see an error message below:The argument(s) provided must not be empty. - If you provide arguments of more than one word separated by whitespaces for any of the fields, e.g.
find n/John Doeyou will see the error message below:The argument(s) provided must not contain more than one word.Please ensure the argument contains one and only one word.
Features for managing bands
Create band: addb
Scenario:
Now, with all the musician contacts in your list, you are ready to create your first band!
Format:
addb n/BANDNAME [g/GENRE]…
Examples:
-
addb n/My Garage Band g/rockThis command creates a rock band named “My Garage Band”.
Things to Note:
- The name of the band must be unique.
![]() Note:
Note:
Conditions for unique band name: Unique sequence of alphanumeric characters (case-insensitive)
- To add the genres the band specialises in using the
g/prefix, you can only add the ones included in a pre-defined list of genres.
![]() Note:
Note:
This command only creates an empty band with the specified name and genre. To add musicians to the band, please use the addm command.
Upon success:
You will see a message indicating successful addition of the band like below:
New band added: My Garage Band; Genres: [rock]
Upon failure:
- Should you input a band which is already in your contact book (i.e. have the same name as an existing band), you will see an error message showing the possible error. Please input a different name.
- Should you try to add a band with invalid genre tags, i.e.,
addb n/My Garage Band g/water, you will see a message like below:Genre tags names should be a valid genre name. For a list of valid genres, please use the command 'tags'
Add musician to band: addm
Scenario:
You have just created a band and are ready to experiment with some cool band makeups. Let’s add some musicians to the band!
Format:
addm b/BAND_INDEX m/MUSICIAN_INDEX…
Examples:
-
addm b/1 m/1 m/2This command adds the first and second musicians in the
My Musicianscontact list to the first band in theMy Bandslist.
Things to Note:
-
BANDINDEXandMUSICIANINDEXmust be positive integers 1, 2, 3, … - You can only add musicians to one band at a time. Adding musicians to multiple bands in a single command is currently not supported.
![]() Tips:
Tips:
If you want to view all your musician contact that you can choose from, you can use the list command. If you want to filter musicians based on preferred genre, you may refer to find command. This allows you to identify musicians who are proficient in the same genre as the band requirement, and optimise your band makeup.
Upon success:
You will see a message indicating successful addition of the musician into the band. The My Bands panel will update to show only the band which the new musicians are added in. The My Musicians panel will update to show all the members of that band.
For example, when we want to add musicians to a blues/jazz band called “Neo Pixel” (3rd in band panel):
-
Let’s first find all musicians who are proficient in blues or jazz with
find g/blues g/jazz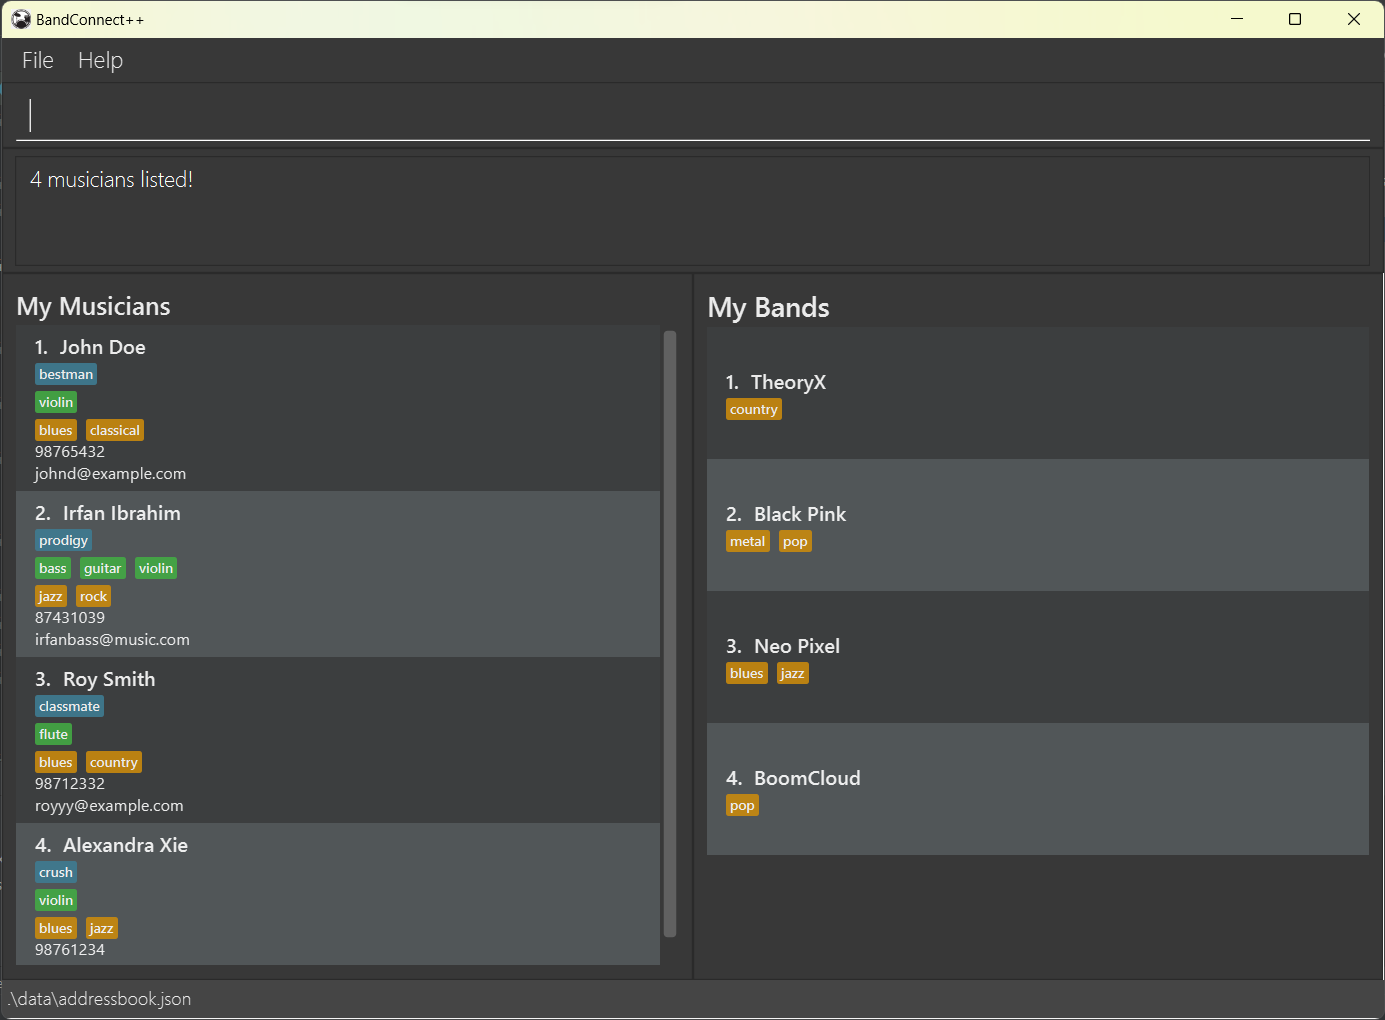
-
Let’s add all 4 musicians to band “Neo Pixel” with
addm b/3 m/1 m/2 m/3 m/4. On the right,My Bandspanel will display the band “Neo Pixel”. On the left,My Musicianspanel will display all musicians in that band.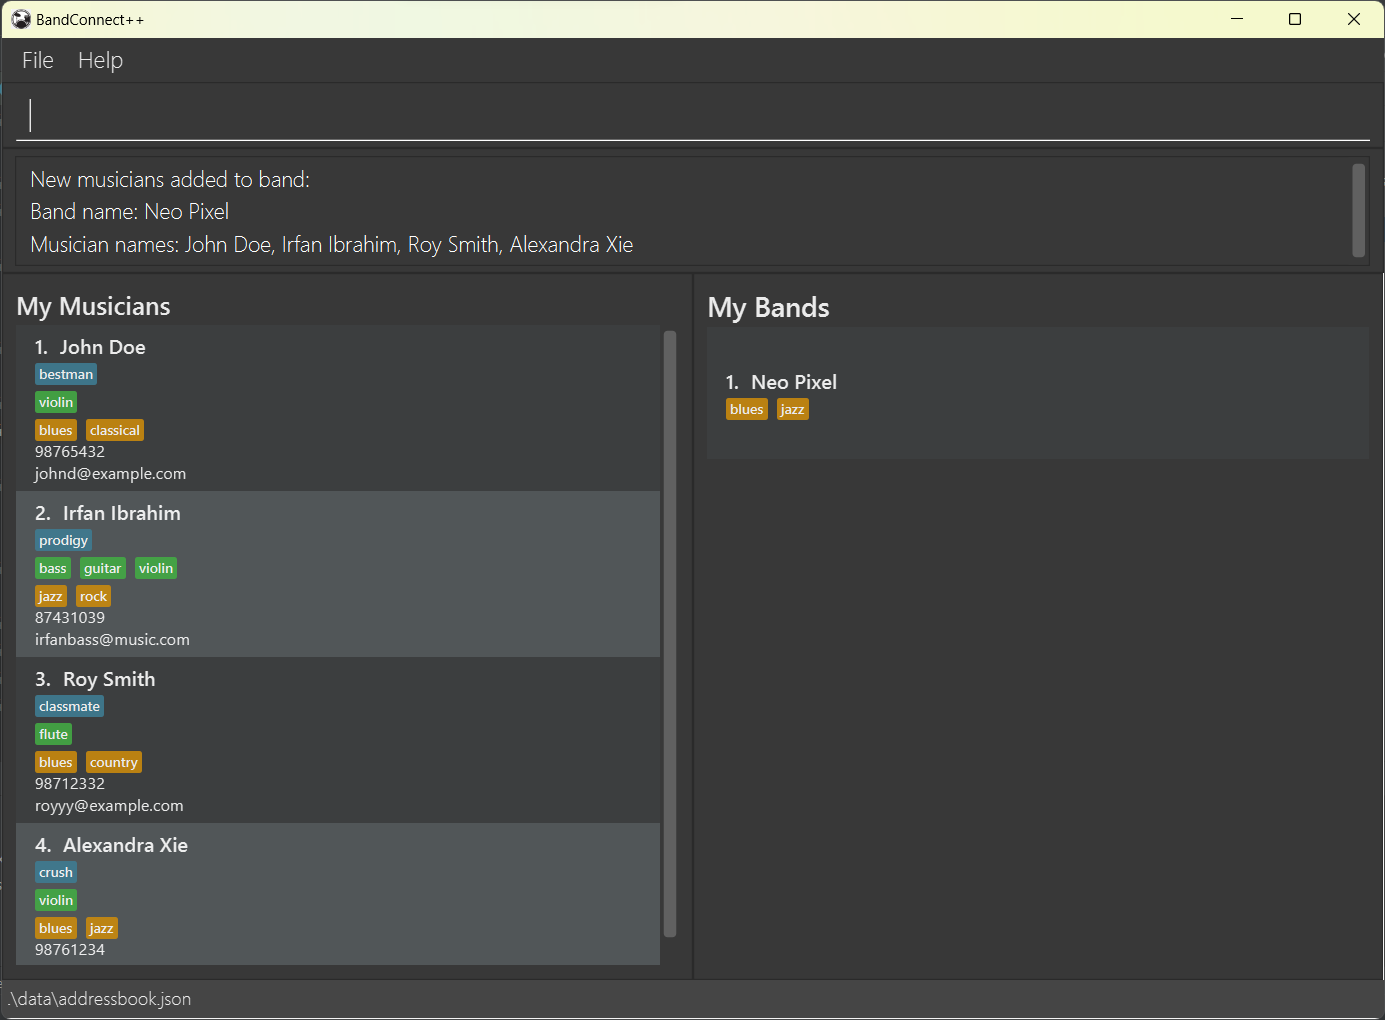
Upon failure:
- Should you input an index that is out of range (e.g. musician index 4 when there are 3 musicians, or band index 2
when there is 1 band), you will see an error message below:
The musician index provided is invalidor
The band index provided is invalid - If the musician(s) you are adding is/are already in the band, you will see an error message below:
One or more of the musicians already exist in the band - If you input more than one field for the prefix
b/, meaning you are trying to add musicians to multiple bands, e.g.addm b/1 b/2 m/1, you will see an error message below:You can only add musicians to one band at a time
Find band: findb
Scenario:
You have created a few bands and added several musicians to each band. Now, you would like to find a particular band and view all the members in it.
Format:
findb BANDNAME
Examples:
-
findb TheoryXThis command finds the band named “theory X” and displays all the members in it.
![]() Note:
Note:
Please ensure that the band name does not contain extra whitespaces
Upon success:
On the left, My Musicians panel will display all musicians in the band. On the right, My Bands panel will display the band of interest.
For example, if we want to view all members in band “TheoryX” with command findb TheoryX
-
Before: From
liststate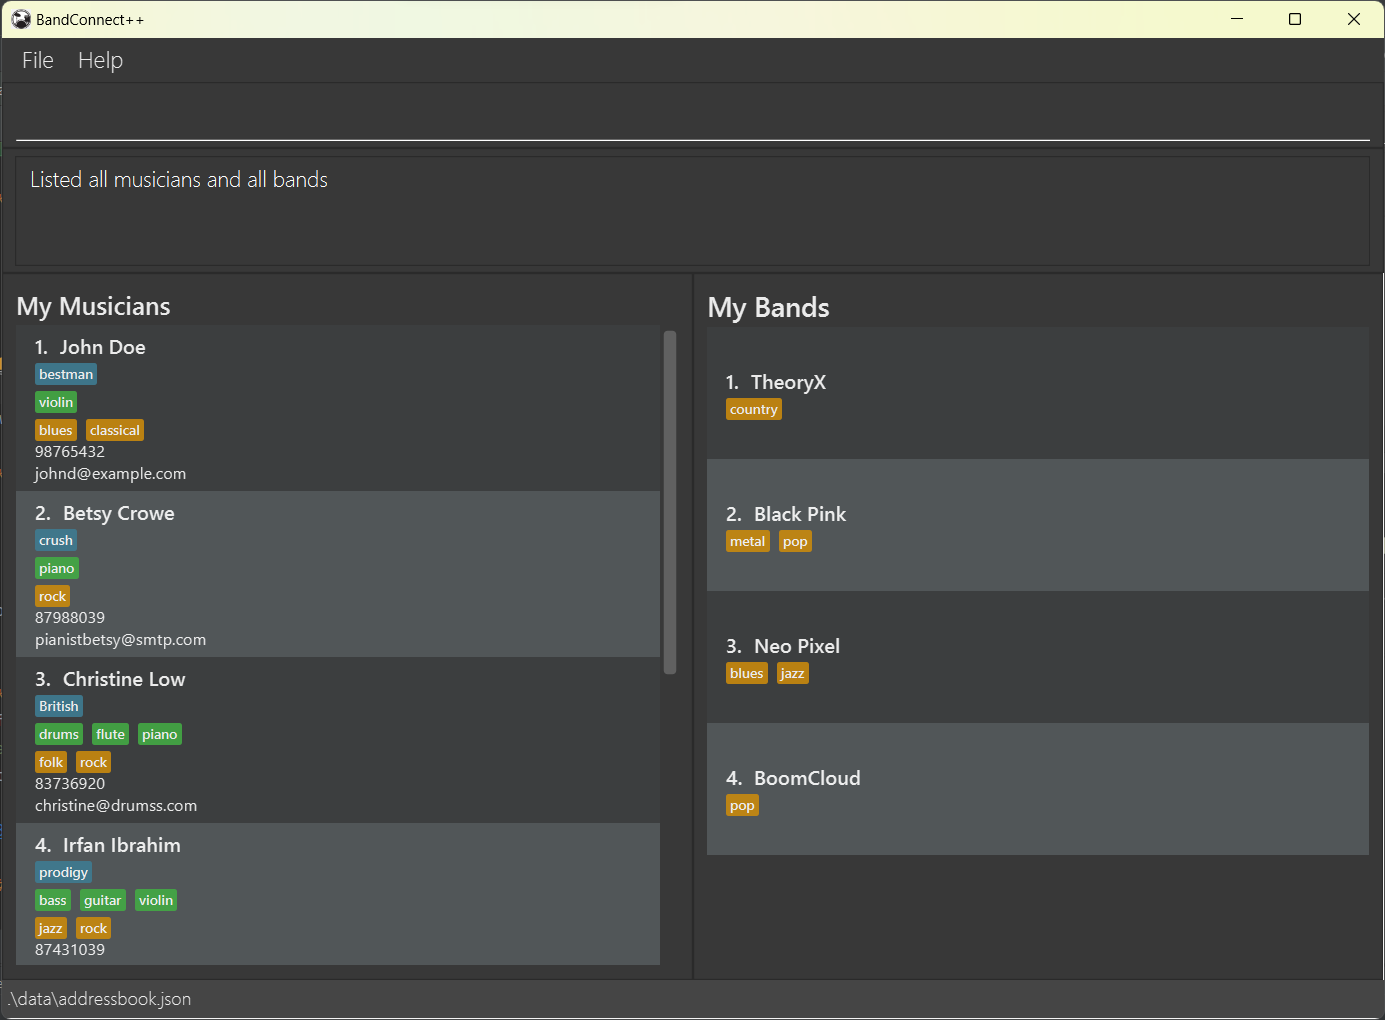
-
After: On the left,
My Musicianspanel will display all musicians in “TheoryX”. On the right,My Bandspanel will display only “TheoryX”.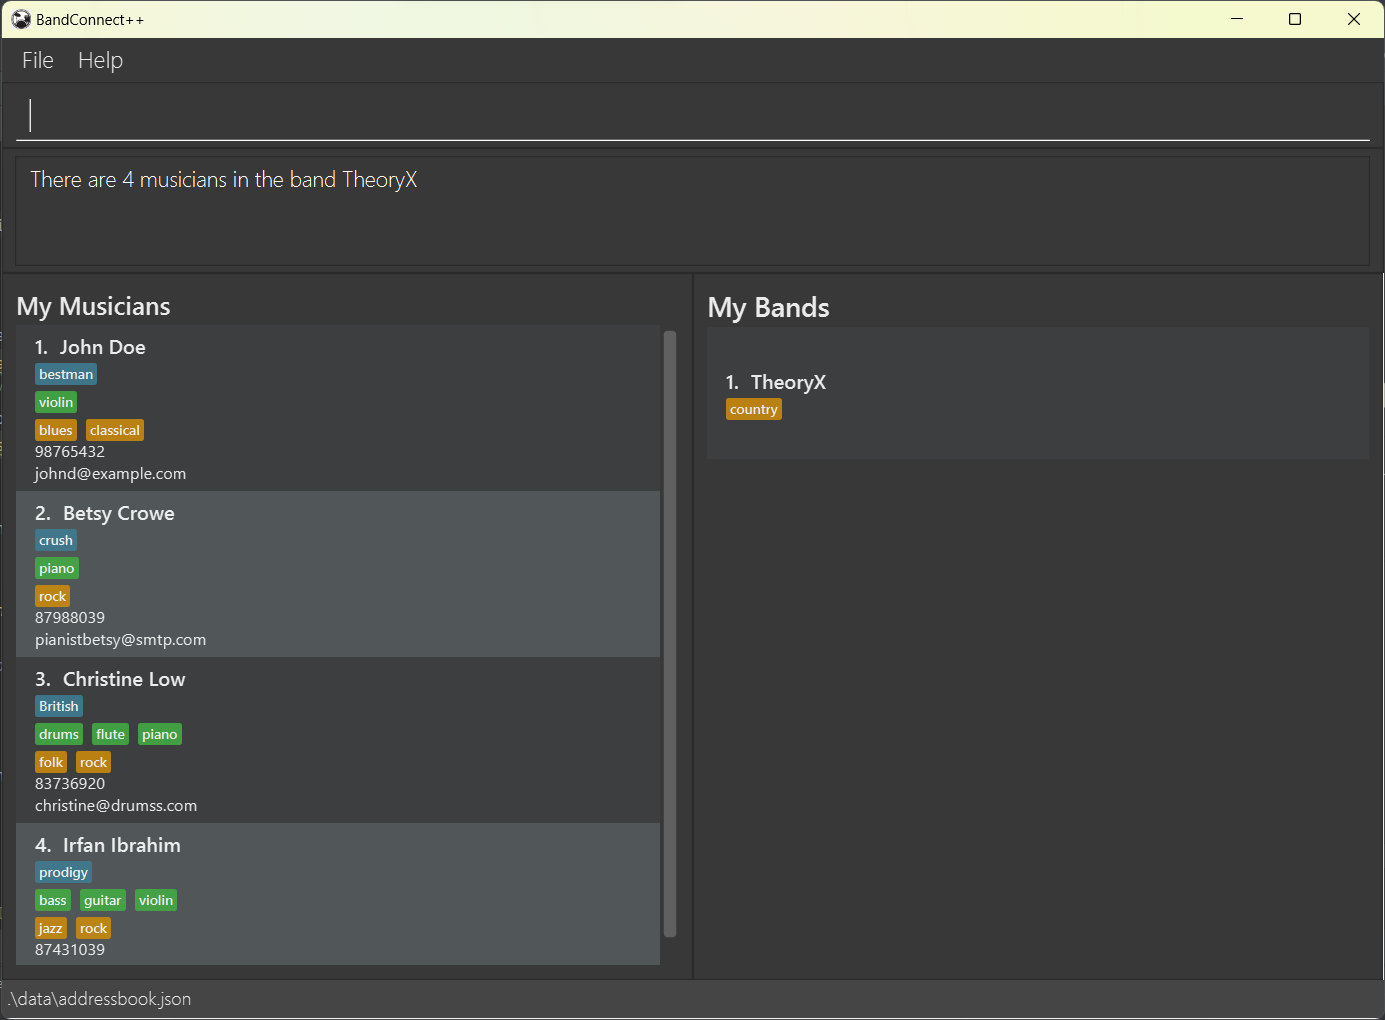
Upon failure:
If you input an invalid band name, you will see an error message as shown below.
Band does not exist!
Please input a valid band name and enter the command again.
Remove musician from band: removem
Scenario:
After experimenting with the band makeups, you may think that a musician is not a good fit for the band and would like to remove him/her from it.
Format:
removem b/BANDINDEX m/MUSICIANINDEX
Examples:
-
removem b/1 m/1This command removes the first musician in the
My Musicianscontact list from the first band in theMy Bandslist.
Things to Note:
-
BANDINDEXandMUSICIANINDEXmust be positive integers 1, 2, 3, … - Unlike the
addmcommand, you can only remove one musician from a band at a time.
![]() Tips:
Tips:
You may want to use the findb command to view all the members of the band first before using this command.
Upon success:
On the left, My Musicians panel will correctly display all musicians in the band, without the deleted musician. On the right, My Bands panel will display the band of interest.
For example, we want to remove John Doe from band TheoryX.
-
Before: First double-check the band members in TheoryX with
findb TheoryX.
-
After: Remove John Doe at position 1 with
removem b/1 m/1. You will see a message indicating successful removal of the musician from the band like below: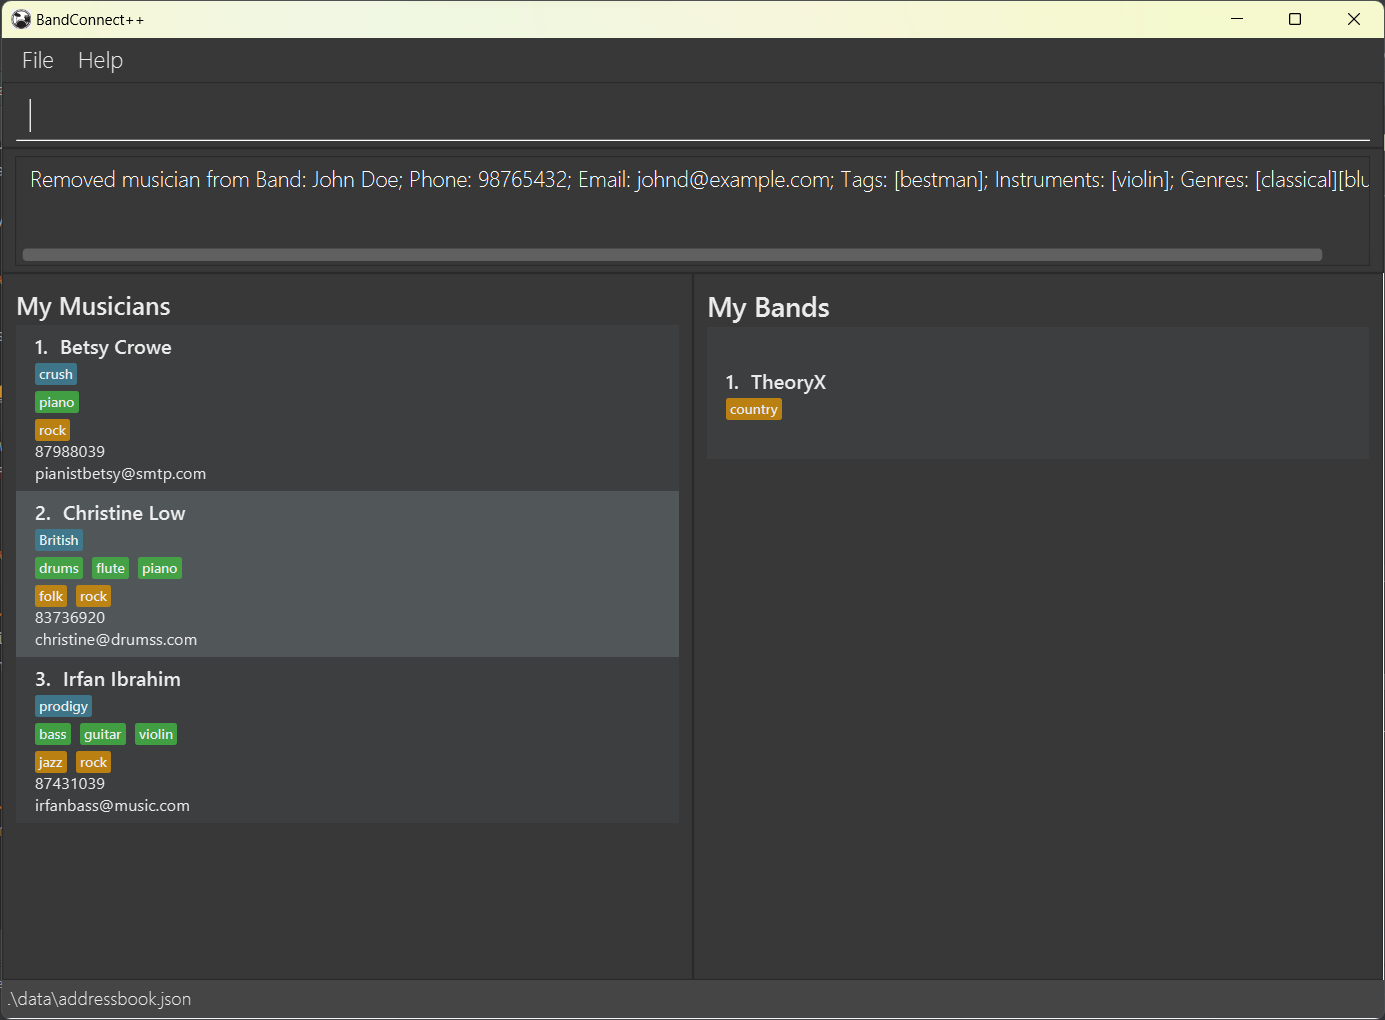
Upon failure:
- Should you input an index that is out of range (e.g. musician index 4 when there are 3 musicians, or band index 2
when there is 1 band), you will see an error message as shown below.
The musician index provided is invalidPlease input a valid index and try again.
- If the musician does not exist in the band, you will see an error message as shown below.
Musician (details of the musician omitted here) is not in the bandPlease verify that the index of the musician is correct or input a different musician and try again.
Edit a band: editb
Scenario:
You may want to change the name of the band or add/remove the genres of the band as a whole besides adding/removing musicians from the band. This is just as easy as creating the band with addb, which you might have already done!
Format:
editb INDEX n/NEWNAME g/GENRE…
Examples:
-
editb 1 n/Ace g/jazzThis command changes the name of the first band in the
My Bandspanel to “Ace” and its genre to “jazz”.
Upon success:
You will see a message indicating successful editing of the first band in the band panel like below:
Edited Band: Ace; Genres: [jazz]
Upon failure:
- Should you input an index out of the range of the current
My Bandslist, you will see the error message below:The band index provided is invalid - Should you attempt to change the name of the band to an existing band name stored by the program, you will see the error message below:
This band already exists in the addressbook.Please verify that the index is correct and try again.
- Should you try to specify an invalid genre for the band i.e.
editb 1 g/poP, you will see a message like below:Genre tags names should be a valid genre name. For a list of valid genres, please use the command 'tags'Please refer to the list of valid genres and try again.
Delete a band: deleteb
Scenario:
You have finished experimenting with the band makeups and gotten your perfect band. Let’s delete the rest of the bands since you no longer need them.
Format:
deleteb INDEX
Examples:
-
deleteb 1This command deletes the first band in the
My Bandspanel.
Upon success:
You will see a message indicating successful removal of the first band in the band panel like below:
Deleted Band: Ace; Genres: [jazz]
Upon failure:
Should you input an index out of the range of the current My Bands list, you will see the error message below:
The band index provided is invalid
Please verify that the index is correct and try again.
General features
Get help: help
If you need help any time, you can access a link to our user guide.
Format: help
You will see a window like below, click Copy URL, paste the link in any web browser to view this user guide.

List all musicians and bands: list
You can view all musicians and bands in their separate panels. This command helps you easily identify any changes made to the contact list.
Format: list
Show all valid instruments and genres: tags
You may want to view all valid instrument and genre tags for musicians and bands.
![]() Note:
Note:
The instrument and genre tags can be added/edited for a musician using the add and edit command with prefix i/ and g/ respectively.
The genre tags can also be added/edited for a band using the addb and editb command with prefix g/. Currently, band does not support instrument tags.
Format: tags
Save data
BandConnect++ data are saved in the hard disk automatically after any command that changes the data. You don’t have to worry about saving data manually, we take care of that for you!
Clear data: clear
Clears all data in the application.
Format: clear
![]() Destructive Command!
Destructive Command!
This command is irreversible, and all your data will be lost. Please use this command with caution.
Exit app: exit
Exits the application.
Format: exit
Congratulations! You are now ready to use BandConnect++ !
You can always refer back to each feature above for detailed explanation and tips. Or, if you need help remembering the syntax, please see below for a more succinct command summary!
Command summary
List of Valid Instruments/Genres
| Type | Acceptable Values |
|---|---|
| Instruments | bass, cello, clarinet, drums, flute, guitar, piano, saxophone, trumpet, violin, voice, other |
| Genres | blues, classical, country, electronic, folk, hiphop, jazz, latin, metal, pop, rock, soul, other |
![]() Note:
Note:
The list of valid instruments and genres accept only lowercase letters. For example, g/Pop will not be accepted. Please use g/pop instead.
Musician Command summary
| Action | Format | Examples |
|---|---|---|
| Add Musician | add n/NAME p/PHONE_NUMBER e/EMAIL [t/TAG]… [i/INSTRUMENT]… [g/GENRE]… |
add n/Betsy Crowe e/pianistbetsy@smtp.com p/87988039 i/piano g/pop g/rock |
| Delete Musician | delete INDEX |
delete 1 |
| Edit Musician | edit INDEX [n/NAME] [p/PHONE_NUMBER] [e/EMAIL] [t/TAG]… [i/INSTRUMENT]… [g/GENRE]… |
edit 2 e/pianistbetsy@edited.com i/violin t/available |
| Find Musicians | find [n/NAME]… [t/TAG]… [i/INSTRUMENT]… [g/GENRE]… |
find n/John i/Piano |
Band Command summary
| Action | Format | Examples |
|---|---|---|
| Create Band | addb n/BANDNAME [g/GENRE]… |
addb n/Ace Jazz g/jazz g/blues |
| Delete Band | deleteb INDEX |
deleteb 1 |
| Edit Band | editb INDEX n/BANDNAME [g/GENRE]… |
editb 1 n/Ace Jazz g/jazz |
| Add Musicians to Band | addm b/BAND_INDEX m/MUSICIAN_INDEX… |
addm b/1 m/1 m/2 |
| Remove Musician from Band | removem b/BANDINDEX m/MUSICIANINDEX |
removem b/1 m/1 |
| Find Band | findb BANDNAME |
findb theory X |
General Command summary
| Action | Format |
|---|---|
| Show All Tags | tags |
| List All Musicians and Bands | list |
| Clear Data | clear |
| Exit App | exit |
Frequently Asked Questions
Q: How do I install Java 11?
A: Follow this link for steps to download Java 11.
Q: How do I transfer my data to another Computer?
A: Go to the application’s home directory and copy the data/addressbook.json file containing your data into the empty data folder created by BandConnect++ on the other computer.
Q: Why is BandConnect++ not displaying all musicians/bands?
A: It’s possible that the application may not be displaying all musicians/bands due to previous commands that have filtered either of the lists. If you’re encountering this issue, consider using the list command to display all musicians and bands.
Q: What if I accidentally close BandConnect++ without using the exit command? Do I lost all my data?
A: Not to worry! BandConnect++ automatically saves all data after each change you make, so no data is lost.
Q: What if I encounter a bug or want to suggest a new feature?
A: We value all feedback from our users! Please open an issue to report a bug or suggest a feature on our GitHub Repository
Q: Do I need an active internet connection to use BandConnect++?
A: No, BandConnect++ does not require an internet connection to be used. However, you’ll need an internet connection to download it.
Q: How do I check if I am using Java 11?
A: The method to check the Java version you use will be different for every operating system.
-
Windows users:
Click on the ‘Windows’ key and search for ‘Command Prompt’
-
Mac users:
Click on ‘F4’ and search for ‘Terminal’ -
Linux users:
Click on ‘Ctrl’ + ‘Alt’ + ‘T’ keys simultaneously - Once the application is open, type
java -versionand hit ‘Enter/ Return’. - The application should state your Java version, as shown below:

- If you do not see
11.__.__, or if you do not have Java installed, follow the instructions here to download Java 11.
Troubleshooting
| Issue | Possible Reason | What to do now |
|---|---|---|
| Unable to launch application | Java version is incompatible for some Mac users | Visit this website for further details. |
| Application opens off-screen | Preferences are incorrectly formatted when using multiple screens before switching to one screen only | Delete the preferences.json file created by the application before running the application again. |
Glossary
| Term | Definition |
|---|---|
| CLI | Command Line Interface (CLI) is a text-based user interface that allows users to interact with a computer program by typing in commands through a keyboard. Since a mouse is not needed for CLI, it is often a more efficient interaction method for fast typists. |
| GUI | Graphical User Interface (GUI) is a user interface that allows users to interact with the application using graphical elements like text fields, buttons, and menus. |
| Parameter | Parameters are specific settings for you to customise your command. For example, the name and phone number of a musician are parameters. |
| Command | A command is an instruction given to the application to perform a specific action. For example, list is a command that displays all musicians and bands. |
| JAR | A package of all resources for BandConnect++ to run. The only thing you need to download is the BandConnect++ JAR file! |
| JSON | JSON stands for JavaScript Object Notation. JSON is a lightweight format for storing and transporting data |
| Index | The position of something in a list. For example, the first item on your list in Bandconnect++ has an index of 1. |
| Java | Java is the primary programming language used to develop and use BandConnect++. Installation of Java is required to successfully run the application. |